How do you get all that thread and stuff organized before you stitch? I admit that getting all that together is half the fun. It’s exciting to think about the work ahead, the beautiful piece as it slowly comes together. A place for everything and everything in its place. If only I could apply that idea to the rest of my house…oh the closets…yeesh…
I like to use cards to organize my colors. Kits will often come with a card (sometimes they are even color-coded for you, swoon!) but index cards work just as well. I use the index cards for projects in books/non-kits.
I’ll start with a WIP that came as a full kit that came with all the supplies needed. Here is Man’s Best Friend by Dimensions Gold. I consider this to be a large project, because the finished piece is bigger than 5×7.
First thing I do is scan the pattern and print out a copy. This leaves the original clean in case I lose the pattern and I can also print out as many copies as I need to if mark-ups make it hard to read. I often scan the pattern and enlarge pages, making them easier to read. Here’s where my mapping skills come in. I so love this. Make one copy for the main stitches and another one later for the backstitching and other details. Mark up that paper as much you want to. No worries! You can print another one! I keep the original pattern and the picture of the piece in a folder. I cut out the picture from the cover of the kit as a reference. I like to attach it to a tin with a magnet (handy for lost needles too) or just stash it in the box.
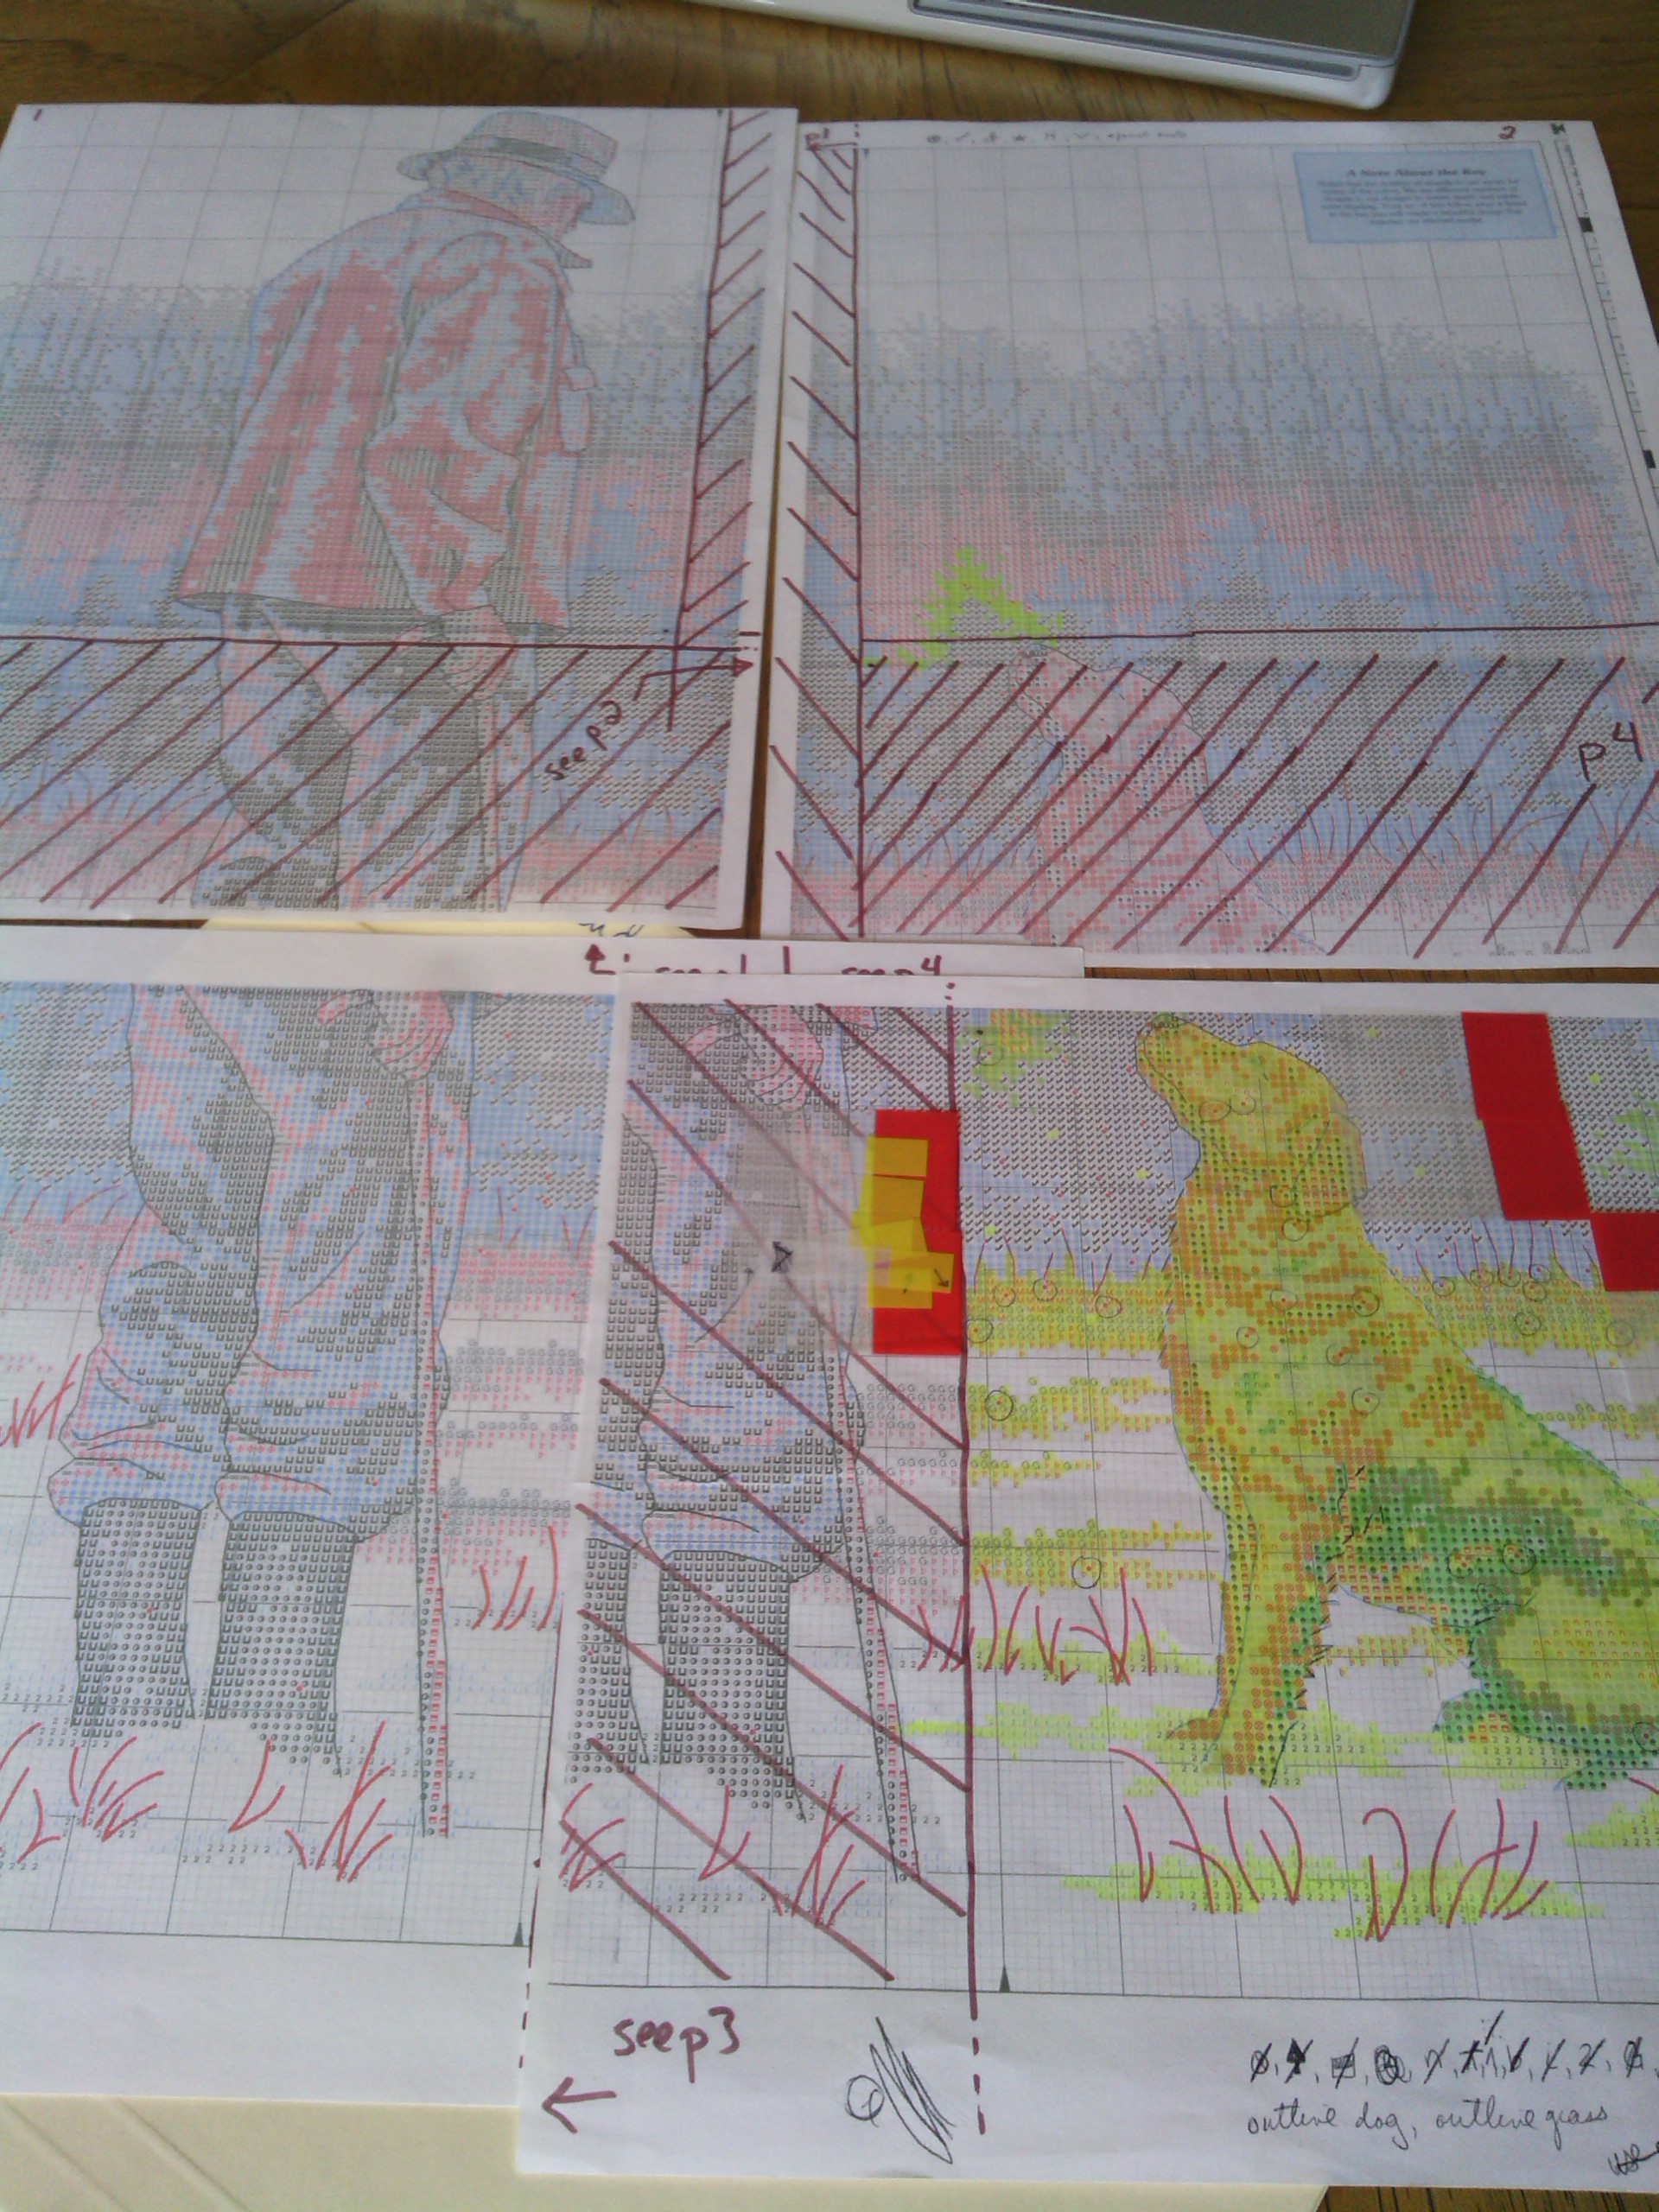
For this particular pattern I separated it into 4 parts to form a square. It helps me to have a plan like this on bigger projects, to help break it into smaller parts that are easier to tackle. It’s much easier to read now that is is bigger. I began in one corner, and plan to go mostly counter-clockwise. Once I’ve started stitching, I tend to pick something out and finish it. You can see I’ve done the dog, then spread out to the grass, now I’m into the forest in the background. Once I finish that, I will even go through and put in the details (backstitching, couching, french knots) before heading to the next section. This is the first project where I have done the details so soon. I usually wait until the end, but this split into 4 squares so nicely, that I think it will work. Plus, that dang forest is pretty daunting, and by getting finishing it once section at a time, it won’t be so daunting anymore. The more I get into it, I may not want to do more green half stitches for awhile, but at least I’ll know that the bottom right section is done, you know? It can be maddening to go so long stitching away, then remember, zomg, I have to freakin detail this guy too.
Anyway. Next I separate the thread and organize it onto the card, where my Sharpies come in! I mark on the index card, or the card provided, the color names of the floss and their symbols, matching them as best I can with the actual pattern. Hence, I use blue, red, black, and green markers. The kits always come with nice instructions on how to organize the thread. I love drawing the little symbols. I recommend sorting the floss in a very well lit room; sunlight is best. Being in a sunny place with stitching is a bonus anyway. Backyard tables are great for this. I let the kids meander and get dirty while I get to sit at the nice table with a cuppa coffee. But watch out on windy days-a box or bag comes in handy. I’ll get to that.

Anyway, again. I mark where I have stitched with a highlighter, typically yellow because I can still see what’s going on. Compared to say, blue, which pretty much covers everything. I may need to refer to a finished area again if I mess up, so yellow works best for me. Those highlighter pens are amazing. I know, I totally have pen crushes.
I use the markers again for detailing (backstitch, french knots, etc), but on a fresh copy. I just trace where I’ve been for the outlines, and make dots for the french knots, etc. Man, it made it a lot easier when I just started printing out more copies like that. Now I don’t worry about messing up the pattern. One less thing to worry about is always good.
Here is my progress so far:

and what my WIP looks like as a whole:

(yes, that’s a cigarette tin. No, I don’t smoke but those tins are fab!)
I like keeping this one in a metal binder. I used these in school a lot for field exercises, and I use them at work too. They’re fairly indestructable and I love the clip to hold the pattern in place. I like using the colored tabs to mark out a section, like this:

There are fancy pattern holders out there that are very nice, too, but this has worked for me since about 1999. It ain’t broke, I won’t fix it. These aluminum boxes are available at most office supply stores. I use a lot of different boxes or bags for projects. Whatever is available or the right size will do. I keep most of the supplies I’ll need with the WIP, like scissors, highlighter pen, scrap tin, etc. Everything is there if I get the urge to work on it.
Back to planning: even though I had planned on going counter-clockwise, I think once I’m done with this section I will go clockwise, and stitch the man. Then I can finish the bottom left.
Who knows when I’ll finish this? I got it on sale at a well-known craft store, back when they had nice kits like this. I think this retails for about $30 and I found it for $7. WOOT! I’ll give it to my folks when it’s done and they’ll frame it. I have already done two or three lab projects for them. I have a weakness for labradors, especially tubby yellow ones.
I hope this helps you if you are thinking about getting into something a little more challenging than the tiny ornament sized kits or little charts from a book.